Coco Soy Blended Wax
Coco Soy Blended Wax
Coco Soy Blended Wax (Coconut and Soy Container Candle Wax, Flakes)
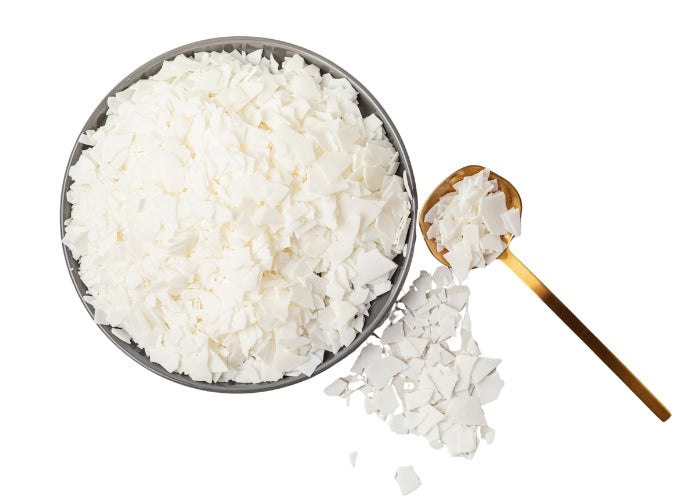
Coco Soy Blended Wax is a blend of soy wax and coconut wax for container candles and wax melts. It is supplied as white to creamy white waxy flakes that melt quickly and evenly, and many makers choose a coconut and soy blend for a smooth, creamy-looking finish. You add your own fragrance oil, dye and wick, so every candle is yours to design.
We supply our Coco Soy Blended Wax from Kaiapoi, Christchurch, in sizes from 1 kg up to 20 kg for hobbyists, markets and small businesses. Every order is backed by a Specifications sheet, Safety Data Sheet, Ingredient Statement and Candle Making Quick Guide, all linked in the Product Documents section below.
|
Coconut and soy blend Candles and wax melts |
Melts at about 47 °C Low melt point |
Fragrance up to 10% Of wax weight |
Beginner friendly Melt, scent, pour, cure |
Safety information: for full hazard, handling and safety information, please see the Safety Data Sheet in the Product Documents section below.
Specifications
| Specification | Detail |
|---|---|
| Product | Coco Soy Blended Wax |
| Type | Coconut and soy blended container candle wax, supplied as flakes |
| Composition | Blend of soy wax (hydrogenated soybean oil) and coconut wax (hydrogenated coconut oil). Blend proportions not stated |
| Appearance | White to creamy white waxy flakes |
| Melt Point | About 47-48 °C (117-118 °F) |
| Melting and Fragrance Step | Melt to about 80 °C (176 °F), take off the heat, add fragrance and stir gently for about 2 minutes |
| Recommended Fragrance Load | Up to 10% of wax weight. Always test |
| Pour Temperature | 45-65 °C (113-149 °F). A good starting point is about 55 °C (131 °F) |
| Best Suited For | Container candles and wax melts. For pillars, see our Soy Wax (Pillar Blend) 58° |
| Wick Guidance | CDN or ECO wicks, sized to the container. Always test (see the wick guide below) |
| Cure Time | 48 hours before a test burn. 1 to 2 weeks for best scent throw |
| Yield | About 6 x 220 ml or 4 x 315 ml candles per kg of wax (varies with fill) |
| Pack Sizes | 1 kg, 2 kg, 5 kg, 10 kg, 20 kg |
| Storage | Cool, dry place, sealed, away from heat and sunlight |
| Use | Candle and wax melt making only. Not for food, cosmetic or topical use |
How to Make a Coco Soy Container Candle
- Get set up. Have clean, dry containers at room temperature, a wick on a wick tab, a wick holder or sticker to keep it centred, scales and a thermometer ready.
- Weigh. Weigh the wax, then weigh fragrance oil at up to 10% of the wax weight. Many makers start lower and work up.
- Melt. Melt in a double boiler or other controlled heat to about 80 °C. Add candle dye now if you are using it and stir until dissolved. Never heat wax directly over a flame or leave it unattended.
- Add fragrance. Take the wax off the heat at about 80 °C, add the fragrance and stir gently for about 2 minutes.
- Cool to pouring temperature. Let the wax cool to 45-65 °C. About 55 °C is a good starting point. Do not leave it liquid for more than about 30 minutes before pouring.
- Pour. Pour slowly into the containers and leave them undisturbed at room temperature, away from draughts. Slower cooling helps the wax stick to the glass.
- Let it set. Leave the candles uncovered for at least 24 hours. If the top looks uneven, it can be smoothed by re-melting it with a heat gun.
- Trim and cure. Trim the wick to about 5 mm. Wait 48 hours before a test burn, then allow 1 to 2 weeks for the best scent throw.
Tip: always make a small test candle first. Every combination of container, wick, fragrance and dye burns a little differently.
What Is Coconut Soy Wax? ▼
Coco Soy Blended Wax combines two plant-based waxes: soy wax, made from hydrogenated soybean oil, and coconut wax, made from hydrogenated coconut oil. Both are hardened vegetable oils that are solid at room temperature. Blending them is a popular way to get a smooth, creamy-looking candle.
The low melt point of about 47-48 °C makes the wax quick to melt and gentle to work with. It is a container wax, designed to be poured into a jar, tin or glass and left to set where it is.
Good to know: candles from plant-based waxes need a proper cure before they perform at their best. Allow 48 hours before a test burn and 1 to 2 weeks for the strongest scent.
Choosing the Right Wax ▼
| Candle type | Wax to use | Notes |
|---|---|---|
| Container candles in jars, tins and glasses | Coco Soy Blended Wax (this wax) | Designed for this. Pour straight into the container. |
| Wax melts and clamshell melts | Coco Soy Blended Wax (this wax) | Pour into silicone moulds or clamshell packs. No wick is needed. |
| Pillars and free-standing candles | Soy Wax (Pillar Blend) 58° | A higher melt point wax suited to holding its own shape. |
| Clear gel candles | Jelly Candle Wax (Gel) | A different wax for a different look. |
| Other container waxes to compare | Golden Brands 464, Natural Soy Wax Flakes 50°C, Coconut Candle Wax | Browse all candle waxes. |
Uses & Project Ideas ▼
Jar candles
The classic use. Pair this wax with our candle jars and glassware for scented candles to keep, gift or sell.
Wax melts
Pour into silicone moulds or clamshell packs for wax melts. Use the same melting and fragrance steps as for candles, and test a small batch first. For firmer melts, see the beeswax tip in the Fragrance, Colour & Additive Guide.
Tins and travel candles
Small tins suit lower-volume batches and make easy gifts and favours.
Gifts, markets and workshops
An easy way to make personalised candles for weddings, birthdays, markets or craft sessions.
Fragrance, Colour & Additive Guide ▼
These are starting points, not fixed rules. Always test a small batch, and follow the safety information for each fragrance oil and dye you use.
| Add-in | Starting point | Notes |
|---|---|---|
| Fragrance oil | Up to 10% of wax weight | Use fragrance oil made for candles. Many makers start lower and work up. Add it off the heat at about 80 °C and stir for about 2 minutes. |
| Liquid candle dye | A few drops at a time | Add to the melted wax and stir until dissolved. Wax looks darker when liquid than when set. Browse our liquid candle dyes. |
| Dye chips | Follow the chip supplier's guidance | Add to the melted wax and stir until fully dissolved. Browse our candle dye chips. |
| Beeswax (optional, for wax melts) | Start with a few percent of wax weight | Some makers stir a small amount of refined beeswax into melts to make them firmer. Use it in moderation, as too much can reduce scent throw. Beeswax is not vegan and adds a slight honey note. Add it to the melted wax and test a small batch. |
| Other additives | Test first | Anything not made for candles can affect the burn, so test a small candle before using it. |
Yield guide: 1 kg of wax makes about 6 x 220 ml candles or about 4 x 315 ml candles, depending on how full you fill the container. Based on jars about 90% full, with fragrance at 8% of wax weight.
Wick Guide ▼
Wick size is the most important choice in a candle. These are starting points only, as the right wick depends on your container, fragrance and dye. Always burn test, then adjust one size at a time.
| Wick | Where to start | Notes |
|---|---|---|
| ECO wicks | Match the wick to the container diameter: 45-70 mm, 75-90 mm or 90-105 mm | Choose by the width of the container, then test. |
| CDN wicks (CDN-7 to CDN-28) | Smaller numbers for smaller containers, larger numbers for wider ones | Test one size either side. Go up a size if the flame is small or the candle tunnels. Go down if the flame is large, smoky or mushrooming. |
| Wick tabs | One on every wick | Holds the wick upright and fixed to the base of the container. |
| Wick holders and wick stickers | One per wick | Keeps the wick centred while the wax sets. A centred wick burns evenly. |
| Wick trimmer | Before every burn | Trim to about 5 mm for a steady flame. |
Troubleshooting ▼
| Problem | Likely cause | What to try |
|---|---|---|
| Frosted or mottled top | Cooling too fast, cold glass or a cool room | Warm the room, use room-temperature containers, avoid draughts and rapid cooling. The top can be re-melted with a heat gun. |
| Wax pulls away from the glass | Cooled too quickly | Pour at the recommended temperature and let the candle cool slowly and undisturbed. |
| Sinkholes or cavities | Wax shrinks as it sets | Re-melt the top with a heat gun or add a small second pour. |
| Weak scent throw | Fragrance added too hot, or not enough cure time | Add fragrance off the heat, stir for 2 minutes and cure for 1 to 2 weeks. |
| Tunnelling or small flame | Wick too small for the container | Try the next wick size up. |
| Large flame, soot or mushrooming | Wick too large or fragrance load too high | Try the next wick size down and trim to 5 mm. |
| Wet spots on the glass | Wax has pulled away from the glass in places | Slow the cooling. Wet spots are cosmetic and do not affect how the candle burns. |
Sizes & Price per kg
| Size | Price | Price per kg | Roughly makes (220 ml candles) |
|---|---|---|---|
| 1 kg | $16.90 | $16.90 | About 6 |
| 2 kg | $32.00 | $16.00 | About 12 |
| 5 kg | $76.50 | $15.30 | About 30 |
| 10 kg | $150.00 | $15.00 | About 60 |
| 20 kg | $275.00 | $13.75 | About 120 |
Burn Safety & Selling Your Candles ▼
Never leave a burning candle unattended. Keep candles away from children, pets, draughts and anything flammable, and burn on a heat-resistant surface. Trim the wick to about 5 mm before each burn and stop burning when about 1 cm of wax is left.
Molten wax and the containers it is heated in can burn. Keep melting wax away from children and pets, and never heat it over a direct flame. Have a lid or damp cloth nearby for emergencies.
Selling your candles? Your labels should include safe-burning warnings and any hazard or allergen information required for the fragrance oil you use. Use the Ingredient Statement and Safety Data Sheet below together with the safety data for everything you add.
Frequently Asked Questions ▼
Is it suitable for container candles?
Yes. This wax is sold for container candles.
Can I make wax melts with it?
Yes. Pour into silicone moulds or clamshell packs for wax melts. Use the same melting and fragrance steps as for candles (fragrance up to 10% of wax weight) and test a small batch first. A small amount of beeswax can help make melts firmer.
Can I make pillar candles with it?
No. It is a soft container wax. For pillars, see our Soy Wax (Pillar Blend) 58°.
How much fragrance can I add?
Up to 10% of the wax weight. Many makers start lower. Always test your own fragrance.
What temperature should I pour at?
45-65 °C, with about 55 °C as a good starting point. Melt to about 80 °C first, add fragrance off the heat and then let it cool to pouring temperature.
Which wick should I use?
It depends on your container. See the Wick Guide above for CDN and ECO wick starting points, and always burn test.
How long should I wait before burning?
Wait 48 hours before a test burn. For the best scent throw, allow 1 to 2 weeks of curing.
Does it contain soy or coconut?
Yes. It is a blend of hydrogenated soybean oil wax and hydrogenated coconut oil wax. Anyone with a soy or coconut allergy or sensitivity should take care.
Is it vegan, palm free or non-GMO?
We don't currently make vegan, palm-free or non-GMO claims for this wax. Ask us if you need one of these confirmed.
How should I store it?
Keep it sealed in a cool, dry place away from heat and sunlight. Stored this way, it keeps well.
Pairs Well With
Pair this wax with fragrance oils for scent. Choose a wick from our candle wicks (ECO and CDN) and secure it with wick tabs, wick holders or wick stickers. Browse our candle jars and glassware for 220 ml, 315 ml and 300 ml containers, add colour with liquid candle dyes or dye chips, and finish with a wick trimmer. See all candle making accessories. |

Product Documents
|
Couldn't load pickup availability
Coco Soy Blended Wax (Coconut and Soy Container Candle Wax, Flakes)
Coco Soy Blended Wax is a blend of soy wax and coconut wax for container candles and wax melts. It is supplied as white to creamy white waxy flakes that melt quickly and evenly, and many makers choose a coconut and soy blend for a smooth, creamy-looking finish. You add your own fragrance oil, dye and wick, so every candle is yours to design.
We supply our Coco Soy Blended Wax from Kaiapoi, Christchurch, in sizes from 1 kg up to 20 kg for hobbyists, markets and small businesses. Every order is backed by a Specifications sheet, Safety Data Sheet, Ingredient Statement and Candle Making Quick Guide, all linked in the Product Documents section below.
|
Coconut and soy blend Candles and wax melts |
Melts at about 47 °C Low melt point |
Fragrance up to 10% Of wax weight |
Beginner friendly Melt, scent, pour, cure |
Safety information: for full hazard, handling and safety information, please see the Safety Data Sheet in the Product Documents section below.
Specifications
| Specification | Detail |
|---|---|
| Product | Coco Soy Blended Wax |
| Type | Coconut and soy blended container candle wax, supplied as flakes |
| Composition | Blend of soy wax (hydrogenated soybean oil) and coconut wax (hydrogenated coconut oil). Blend proportions not stated |
| Appearance | White to creamy white waxy flakes |
| Melt Point | About 47-48 °C (117-118 °F) |
| Melting and Fragrance Step | Melt to about 80 °C (176 °F), take off the heat, add fragrance and stir gently for about 2 minutes |
| Recommended Fragrance Load | Up to 10% of wax weight. Always test |
| Pour Temperature | 45-65 °C (113-149 °F). A good starting point is about 55 °C (131 °F) |
| Best Suited For | Container candles and wax melts. For pillars, see our Soy Wax (Pillar Blend) 58° |
| Wick Guidance | CDN or ECO wicks, sized to the container. Always test (see the wick guide below) |
| Cure Time | 48 hours before a test burn. 1 to 2 weeks for best scent throw |
| Yield | About 6 x 220 ml or 4 x 315 ml candles per kg of wax (varies with fill) |
| Pack Sizes | 1 kg, 2 kg, 5 kg, 10 kg, 20 kg |
| Storage | Cool, dry place, sealed, away from heat and sunlight |
| Use | Candle and wax melt making only. Not for food, cosmetic or topical use |
How to Make a Coco Soy Container Candle
- Get set up. Have clean, dry containers at room temperature, a wick on a wick tab, a wick holder or sticker to keep it centred, scales and a thermometer ready.
- Weigh. Weigh the wax, then weigh fragrance oil at up to 10% of the wax weight. Many makers start lower and work up.
- Melt. Melt in a double boiler or other controlled heat to about 80 °C. Add candle dye now if you are using it and stir until dissolved. Never heat wax directly over a flame or leave it unattended.
- Add fragrance. Take the wax off the heat at about 80 °C, add the fragrance and stir gently for about 2 minutes.
- Cool to pouring temperature. Let the wax cool to 45-65 °C. About 55 °C is a good starting point. Do not leave it liquid for more than about 30 minutes before pouring.
- Pour. Pour slowly into the containers and leave them undisturbed at room temperature, away from draughts. Slower cooling helps the wax stick to the glass.
- Let it set. Leave the candles uncovered for at least 24 hours. If the top looks uneven, it can be smoothed by re-melting it with a heat gun.
- Trim and cure. Trim the wick to about 5 mm. Wait 48 hours before a test burn, then allow 1 to 2 weeks for the best scent throw.
Tip: always make a small test candle first. Every combination of container, wick, fragrance and dye burns a little differently.
What Is Coconut Soy Wax? ▼
Coco Soy Blended Wax combines two plant-based waxes: soy wax, made from hydrogenated soybean oil, and coconut wax, made from hydrogenated coconut oil. Both are hardened vegetable oils that are solid at room temperature. Blending them is a popular way to get a smooth, creamy-looking candle.
The low melt point of about 47-48 °C makes the wax quick to melt and gentle to work with. It is a container wax, designed to be poured into a jar, tin or glass and left to set where it is.
Good to know: candles from plant-based waxes need a proper cure before they perform at their best. Allow 48 hours before a test burn and 1 to 2 weeks for the strongest scent.
Choosing the Right Wax ▼
| Candle type | Wax to use | Notes |
|---|---|---|
| Container candles in jars, tins and glasses | Coco Soy Blended Wax (this wax) | Designed for this. Pour straight into the container. |
| Wax melts and clamshell melts | Coco Soy Blended Wax (this wax) | Pour into silicone moulds or clamshell packs. No wick is needed. |
| Pillars and free-standing candles | Soy Wax (Pillar Blend) 58° | A higher melt point wax suited to holding its own shape. |
| Clear gel candles | Jelly Candle Wax (Gel) | A different wax for a different look. |
| Other container waxes to compare | Golden Brands 464, Natural Soy Wax Flakes 50°C, Coconut Candle Wax | Browse all candle waxes. |
Uses & Project Ideas ▼
Jar candles
The classic use. Pair this wax with our candle jars and glassware for scented candles to keep, gift or sell.
Wax melts
Pour into silicone moulds or clamshell packs for wax melts. Use the same melting and fragrance steps as for candles, and test a small batch first. For firmer melts, see the beeswax tip in the Fragrance, Colour & Additive Guide.
Tins and travel candles
Small tins suit lower-volume batches and make easy gifts and favours.
Gifts, markets and workshops
An easy way to make personalised candles for weddings, birthdays, markets or craft sessions.
Fragrance, Colour & Additive Guide ▼
These are starting points, not fixed rules. Always test a small batch, and follow the safety information for each fragrance oil and dye you use.
| Add-in | Starting point | Notes |
|---|---|---|
| Fragrance oil | Up to 10% of wax weight | Use fragrance oil made for candles. Many makers start lower and work up. Add it off the heat at about 80 °C and stir for about 2 minutes. |
| Liquid candle dye | A few drops at a time | Add to the melted wax and stir until dissolved. Wax looks darker when liquid than when set. Browse our liquid candle dyes. |
| Dye chips | Follow the chip supplier's guidance | Add to the melted wax and stir until fully dissolved. Browse our candle dye chips. |
| Beeswax (optional, for wax melts) | Start with a few percent of wax weight | Some makers stir a small amount of refined beeswax into melts to make them firmer. Use it in moderation, as too much can reduce scent throw. Beeswax is not vegan and adds a slight honey note. Add it to the melted wax and test a small batch. |
| Other additives | Test first | Anything not made for candles can affect the burn, so test a small candle before using it. |
Yield guide: 1 kg of wax makes about 6 x 220 ml candles or about 4 x 315 ml candles, depending on how full you fill the container. Based on jars about 90% full, with fragrance at 8% of wax weight.
Wick Guide ▼
Wick size is the most important choice in a candle. These are starting points only, as the right wick depends on your container, fragrance and dye. Always burn test, then adjust one size at a time.
| Wick | Where to start | Notes |
|---|---|---|
| ECO wicks | Match the wick to the container diameter: 45-70 mm, 75-90 mm or 90-105 mm | Choose by the width of the container, then test. |
| CDN wicks (CDN-7 to CDN-28) | Smaller numbers for smaller containers, larger numbers for wider ones | Test one size either side. Go up a size if the flame is small or the candle tunnels. Go down if the flame is large, smoky or mushrooming. |
| Wick tabs | One on every wick | Holds the wick upright and fixed to the base of the container. |
| Wick holders and wick stickers | One per wick | Keeps the wick centred while the wax sets. A centred wick burns evenly. |
| Wick trimmer | Before every burn | Trim to about 5 mm for a steady flame. |
Troubleshooting ▼
| Problem | Likely cause | What to try |
|---|---|---|
| Frosted or mottled top | Cooling too fast, cold glass or a cool room | Warm the room, use room-temperature containers, avoid draughts and rapid cooling. The top can be re-melted with a heat gun. |
| Wax pulls away from the glass | Cooled too quickly | Pour at the recommended temperature and let the candle cool slowly and undisturbed. |
| Sinkholes or cavities | Wax shrinks as it sets | Re-melt the top with a heat gun or add a small second pour. |
| Weak scent throw | Fragrance added too hot, or not enough cure time | Add fragrance off the heat, stir for 2 minutes and cure for 1 to 2 weeks. |
| Tunnelling or small flame | Wick too small for the container | Try the next wick size up. |
| Large flame, soot or mushrooming | Wick too large or fragrance load too high | Try the next wick size down and trim to 5 mm. |
| Wet spots on the glass | Wax has pulled away from the glass in places | Slow the cooling. Wet spots are cosmetic and do not affect how the candle burns. |
Sizes & Price per kg
| Size | Price | Price per kg | Roughly makes (220 ml candles) |
|---|---|---|---|
| 1 kg | $16.90 | $16.90 | About 6 |
| 2 kg | $32.00 | $16.00 | About 12 |
| 5 kg | $76.50 | $15.30 | About 30 |
| 10 kg | $150.00 | $15.00 | About 60 |
| 20 kg | $275.00 | $13.75 | About 120 |
Burn Safety & Selling Your Candles ▼
Never leave a burning candle unattended. Keep candles away from children, pets, draughts and anything flammable, and burn on a heat-resistant surface. Trim the wick to about 5 mm before each burn and stop burning when about 1 cm of wax is left.
Molten wax and the containers it is heated in can burn. Keep melting wax away from children and pets, and never heat it over a direct flame. Have a lid or damp cloth nearby for emergencies.
Selling your candles? Your labels should include safe-burning warnings and any hazard or allergen information required for the fragrance oil you use. Use the Ingredient Statement and Safety Data Sheet below together with the safety data for everything you add.
Frequently Asked Questions ▼
Is it suitable for container candles?
Yes. This wax is sold for container candles.
Can I make wax melts with it?
Yes. Pour into silicone moulds or clamshell packs for wax melts. Use the same melting and fragrance steps as for candles (fragrance up to 10% of wax weight) and test a small batch first. A small amount of beeswax can help make melts firmer.
Can I make pillar candles with it?
No. It is a soft container wax. For pillars, see our Soy Wax (Pillar Blend) 58°.
How much fragrance can I add?
Up to 10% of the wax weight. Many makers start lower. Always test your own fragrance.
What temperature should I pour at?
45-65 °C, with about 55 °C as a good starting point. Melt to about 80 °C first, add fragrance off the heat and then let it cool to pouring temperature.
Which wick should I use?
It depends on your container. See the Wick Guide above for CDN and ECO wick starting points, and always burn test.
How long should I wait before burning?
Wait 48 hours before a test burn. For the best scent throw, allow 1 to 2 weeks of curing.
Does it contain soy or coconut?
Yes. It is a blend of hydrogenated soybean oil wax and hydrogenated coconut oil wax. Anyone with a soy or coconut allergy or sensitivity should take care.
Is it vegan, palm free or non-GMO?
We don't currently make vegan, palm-free or non-GMO claims for this wax. Ask us if you need one of these confirmed.
How should I store it?
Keep it sealed in a cool, dry place away from heat and sunlight. Stored this way, it keeps well.
Pairs Well With
Pair this wax with fragrance oils for scent. Choose a wick from our candle wicks (ECO and CDN) and secure it with wick tabs, wick holders or wick stickers. Browse our candle jars and glassware for 220 ml, 315 ml and 300 ml containers, add colour with liquid candle dyes or dye chips, and finish with a wick trimmer. See all candle making accessories. |
|
Product Documents
|